 On Rhythm

“Two principles underlie all forms of human expression… unity and rhythm”– Bill Moore
Music and the visual arts share rhythm. Typically, throughout a musical piece, a beat is present. Depending on the piece, a change in the beat’s emphasis may occur, changing slightly on the next beat, perhaps changing again, again and again – before finally returning to the beat’s original setting. Much of the structure of music is based on things repeating and varying. It’s the same thing in the visual arts. Rhythm is about repeating and varying some thing, whether it’s a melodic theme from a piece by J.S. Bach or the pattern of shapes and lines of an Alexander Calder mobile.
In the following section, you’ll find a series of exercises intended to demonstrate how rhythm happens. Review the following presentation on rhythm before diving into the exercises. You’ll likely be referring to it again. Pay special attention to the role of sequencing.
Please note: Exercises in Unity are currently under development.
Exercises in Rhythm 1.0, 2.0, 3.0 and 4.0
1.0 Creating a Sequence:
Create a 6-inch square either by hand or digitally in low resolution. Fill it with a medium gray. Create 9 perfectly round 3/4” black circles and place them horizontally next to each other to create an uninterrupted sequence from left edge to right edge, stretching across the center of the square. Compare with the example below for accuracy but do not post.
Example of this exercise applied:
http://pinterest.com/pin/308496643194854032/
Creating an Interrupted Sequence
2.0 Creating an Interrupted Sequence:
Repeat the same steps as above but remove any two circles while the other circles remain in place. See if you can create a sense of continuance where all the remaining circles seem that they are still part of a horizontal line.
2.1 Creating an Interrupted Sequence:
Repeat the same steps as above but remove any two circles while the other circles remain in place. See if you can create a sense of continuance where all the remaining circles seem that they are still part of a horizontal line.
2.2 Creating an Interrupted Sequence:
Repeat the same steps as above but remove any three circles.
2.3 Creating an Interrupted Sequence:
Repeat the same steps as 1.0 but remove any four circles.
Examples of this exercise applied:
http://pinterest.com/pin/308496643194854016/
http://pinterest.com/pin/308496643194853791/
http://.com/pin/308496643195594857
2.4 Creating an Interrupted Sequence:
Repeat the same steps as 1.0 but remove any five circles.
Save as Rhythm2.4-YourUserName.jpg. Post under Category 6.
At this point, you’ll notice that the sequence of circles continues despite the fact that some if not most of the original circles are missing. This effect is called closure. The mind fills in the missing material (provided there’s enough remaining material to begin with). It’s why a dotted line is still considered a line.
This continuance thing is what makes text look organized, as in the example you’re looking at now: All the lines of text on this page are aligned flush left.
You’ll also notice that a pulse has begun to appear in at least one of your sequence exercises. The missing or changed intervals of circles are allowing an overall dynamic effect called rhythm to take place. Now let’s see if we can create rhythm in a different way. If instead of taking circles away, what if we begin changing some things about the original 1.0 sequence of circles?
Creating an Altered Sequence
3.0 Creating an Altered Sequence:
Create a 6-inch square and follow the same instructions for 1.0 Building a Sequence. Fill your nine circles (no visible outlines) with a variety of black, grays and white; one solid value per circle. How many of each value is up to you. Arrange your circles edge to edge where the overall effect is that of an visual pulse or beat.
Save as Rhythm3.0-YourUserName.jpg. Post under Category 7.
The varied values should create a “pulse” within your sequence of circles. This amounts to an additional way of making rhythm; one that’s created by tone or value. And just like the 2.0 exercises above, repetition and variation create rhythm. Let’s try another means or two of creating rhythm: by varying changes in a pattern’s size and layout.
Examples of this exercise applied:
http://pinterest.com/pin/308496643195406040/
http://pinterest.com/pin/308496643195577050/
Creating a Progressive Sequence
4.0 Creating a Progressive Sequence:
Create a 6-inch square. Fill it with a medium gray. Create between four (4) and six (6) white circles. Make your first circle ½” diameter. No two circles should be similar in size with one another. In fact, there should be a contrast of size. Make each of the remaining circles progressively larger in size. Space the circles out from small to large, centered on an imaginary horizontal axis (as seen in the video on Rhythm). As your circles increase in size, make sure the spacing between the circles (called negative space) increases in size as well. It’s okay if your sequence-of-circles fall short of touching the square’s sides. It’s also ok if they do. It’s also ok if a circle creeps over the square’s edge (a “bleed”), as long as the excess is trimmed and therefore not visible.
Save as Rhythm4.0-YourUserName.jpg. Post under Category 8.
Example of this exercise applied:
http://pinterest.com/pin/308496643195590157
Creating an Altered-Progressive Sequence
4.1 Creating an Altered-Progressive Sequence:
Same gray background as 4.0 but add two circles if necessary to bring the total up to six differently sized circles. Give each circle its own dark, light or gray fill. Instead of arranging the circles and their negative space from large to small, shuffle the circles along their horizontal axis to create a far more varied arrangement. Overlapping is okay but shouldn’t dominate. Intervals between the circles do not have to be even; in fact, they shouldn’t. “Bleeding” is okay.
Save as Rhythm4.1-YourUserName.jpg. Post under Category 9.
Can you begin to appreciate the difference between a graduated, steady sequence and varied, pulsating sequence? Can you also begin to see the difference between various types of rhythms?
Examples of this exercise applied:
http://pinterest.com/pin/308496643195423612/
http://pinterest.com/pin/308496643195400392/
http://pinterest.com/pin/308496643195691069/
Now let’s change things a little bit and add another layer of elements to coordinate.
Creating a Symmetrical Sequence of Two Elements:
5.0 Create a 5”x12” vertical format either by hand or digitally in low resolution. Fill it with gray. Create at least five perfectly round circles (each circle on a different layer if done digitally) all the same size. Create at least five straight lines (each line on a different layer if done digitally) all the same thickness and length. The color palette is either black and white. Assign black or white for all of your lines; assign the opposite for all your circles.
Next, arrange your circles in a vertically symmetrical arrangement. Space them apart from each other along a vertical axis as you see fit. Next, arrange your lines in a vertically symmetrical arrangement as well, spacing them apart from each other along a vertical axis as you see fit. Your goal is to create a vertically symmetrical composition where the left vertical half is identical to the right vertical half. If successful, you will have created a symmetrically balanced design that includes the principle of depth due to the overlapping of your objects and your arrangement of colors or values. Compare with the example below for accuracy but do not post.
Examples of this exercise’s principles applied:
http://pinterest.com/pin/308496643195691219/
http://pinterest.com/pin/308496643195691228/
Creating a Symmetrical, Altered Sequence of Two Elements:
5.1 Same instructions as in 5.0, but remove one, two or three circles and one, two or three lines from the sequence of each so as to create an alternation in the sequence of circles and an alternation in the sequence of lines. Bleeding is okay.
Save as Rhythm5.1-YourUserName.jpg. Post under Category 10.
Examples of this exercise applied:
http://pinterest.com/pin/308496643195691179/
http://pinterest.com/pin/308496643195594857/ (asymmetrical, but the use of horizontal and vertical intervals is the important thing)
http://pinterest.com/pin/308496643195691208/
http://pinterest.com/pin/308496643195697985/
Creating an Asymmetrical, Altered Sequence of Two Elements:
5.2 Same instructions as in 5.0, but arrange the circles asymmetrically. Next, arrange the lines asymmetrically. If desired, change the spacing within your pattern of circles or pattern of lines as you see fit. The goal is to create an overall sense of asymmetrical balance: A felt state of balance where mismatching left and right halves feel equal in weight with each other.
Save as Rhythm5.2-YourUserName.jpg. Post under Category 11.
Examples of this exercise applied:
http://pinterest.com/pin/308496643195697806/
http://pinterest.com/pin/308496643195697876/
http://pinterest.com/pin/308496643195697918/
Creating an Asymmetrical, Altered Sequence of Two Elements with Focal Point:
5.3 Same instructions as in 5.2, but now assign a focal point. As a reminder, a focal point is the single most active area in a composition. It’s the first place a viewer would go, assuming you desire to build a visual entry area. It’s okay to add or remove shapes and lines, modify sizes, locations and values, even bleed. This is a variation of your first exercise, Contrast and Balance 1.0 where you tried to create balance by making three different circles equally visible at the same moment. Only in this case, you’re now modifying balance in order to create a visual hierarchy. Hierarchy is all about what you want the viewer to see first, second, third and so on.
Save as Rhythm5.3-YourUserName.jpg. Post under Category 12.
Examples of this exercise applied:
http://pinterest.com/pin/308496643195697856/
http://pinterest.com/pin/308496643195697987/
http://pinterest.com/pin/308496643195698004/
http://pinterest.com/pin/308496643195698024/
Design Principles 101
Understanding the structure of art and design
Exercises in Rhythm
On Rhythm
“Two principles underlie all forms of human expression… unity and rhythm.” – Bill Moore

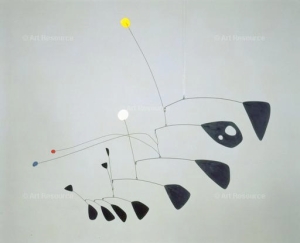
Calder, Alexander (1898-1976) © ARS, NY
Antennae with Red and Blue Dots. c. 1953.
Aluminum, steel and wire. 111 x 128.2 cm.
Tate Gallery, London, Great Britain; ART13742. Photo Credit: Tate, London / Art Resource, NY
Music and the visual arts share rhythm. Typically, throughout a musical piece, a beat is present. Depending on the piece, a change in the beat’s emphasis may occur, changing slightly on the next beat, perhaps changing again, again and again – before finally returning to the beat’s original setting. Much of the structure of music is based on things repeating and varying. It’s the same thing in the visual arts. Rhythm is about repeating and varying some thing, whether it’s a melodic theme from a piece by J. S. Bach or the pattern of shapes and lines of an Alexander Calder mobile.
In the following section, you’ll find a series of exercises intended to demonstrate how rhythm happens. Review the following presentation on rhythm before diving into the exercises. You’ll likely be referring to it again. Pay special attention to the role of sequencing.

Exercises in Rhythm
© Copyright 2013 Howard Schneider
1.0 Creating a Sequence
1.0 Create a 6-inch square either by hand or digitally in low resolution. Fill it with a medium gray. Create 9 perfectly round 3/4” black circles and place them horizontally next to each other to create an uninterrupted sequence from left edge to right edge, stretching across the center of the square like the example below. Do not post this exercise. It’s just a starting point for the next seven exercises.

Example of this exercise applied:
http://pinterest.com/pin/308496643194854032/
2.0-2.3 Creating an Interrupted Sequence
2.0 Repeat the same steps as above but remove any two circles while the other circles remain in place. See if you can create a sense of continuity where all the remaining circles seem that they are still part of a horizontal line. Save as: Rhythm2.0-yourusername.jpg. Upload to Forum category: “Rhythm2.0″.
2.1 Repeat the same steps as above but remove any three circles. See if you can create a sense of continuity where all the remaining circles seem that they are still part of a horizontal line. Save as: Rhythm2.1-yourusername.jpg. Upload to Forum category: “Rhythm2.1″.
Examples of this exercise applied:
http://pinterest.com/pin/308496643195831815/
http://pinterest.com/pin/308496643195406158/
http://pinterest.com/pin/308496643195423612/
http://pinterest.com/pin/308496643195823471/
2.2 Repeat the same steps as 1.0 but remove any four circles. See if you can create a sense of continuity where all the remaining circles seem that they are still part of a horizontal line. Compare with this student example only after you’ve attempted the exercise so you can confirm its general accuracy. Save as: Rhythm2.2-yourusername.jpg. Upload to Forum category: “Rhythm2.2″.
Examples of this exercise applied:
http://pinterest.com/pin/308496643194854016/
http://pinterest.com/pin/308496643194853791/
http://pinterest.com/pin/308496643195594857/
2.3 Repeat the same steps as 1.0 but remove any five circles. See if you can create a sense of continuity where all the remaining circles seem that they are still part of a horizontal line. Save as Rhythm2.3-YourUserName.jpg. Upload to Forum category: “Rhythm2.3″.
At this point, you’ll notice that the sequence of circles continues despite the fact that some if not most of the original circles are missing. This effect is called Closure. It’s one of the ways to create Unity. The mind fills in the missing material (provided there’s enough remaining material to begin with). It’s why a dotted line is still considered a line.
Referring to the Rhythm video, this Continuance thing is what makes text look organized, as in the example you’re looking at now: All the lines of text on this page are aligned flush left.
You’ll also notice that a pulse has begun to appear in at least one of your sequence exercises. The missing or changed intervals of circles are allowing an overall dynamic effect called rhythm to take place. Now let’s see if we can create rhythm in a different way. If instead of taking circles away, what if we begin changing some things about the original 1.0 sequence of circles?
3.0 Creating an Altered Sequence
3.0 Create a 6-inch square and follow the same instructions for 1.0 Creating a Sequence. Fill your nine circles (no visible outlines) with a variety of black, grays and white; one solid value per circle. How many of each value is up to you. Arrange your circles edge to edge where the overall effect is that of an visual pulse or beat. Compare with this student example only after you’ve attempted the exercise so you can confirm its general accuracy. Save as Rhythm3.0-YourUserName.jpg. Upload to Forum category: “Rhythm3.0″.
The varied values should create a “pulse” within your sequence of circles. This amounts to an additional way of making rhythm; one that’s created by tone or value. And just like the 2.0 exercises above, repetition and variation create rhythm. Let’s try another means or two of creating rhythm: by varying changes in a pattern’s size and layout.
Examples of this exercise applied:
http://pinterest.com/pin/308496643195406040/
http://pinterest.com/pin/308496643195577050/
4.0 Creating a Progressive Sequence
4.0 Create a 6-inch square. Fill it with a medium gray. Create between four (4) and six (6) white circles. Make your first circle ½” diameter. No two circles should be similar in size with one another. In fact, there should be a contrast of size. Make each of the remaining circles progressively larger in size. Space the circles out from small to large, centered on an imaginary horizontal axis (as seen in the video on Rhythm). As your circles increase in size, make sure the spacing between the circles (called negative space) increases in size as well. It’s okay if your sequence-of-circles fall short of touching the square’s sides. It’s also ok if they do. It’s also ok if a circle creeps over the square’s edge (a “bleed”), as long as the excess is trimmed and therefore not visible. Compare with this student example only after you’ve attempted the exercise so you can confirm its general accuracy. Save as Rhythm4.0-YourUserName.jpg. Upload to Forum category: “Rhythm4.0″.
Example of this exercise applied:
http://pinterest.com/pin/308496643195590157
5.0 Creating an Altered-Progressive Sequence
5.0 Same gray background as 4.0 but add two circles if necessary to bring the total up to six differently sized circles. Give each circle its own dark, light or gray fill. Instead of arranging the circles and their negative space from large to small, shuffle the circles along their horizontal axis to create a far more varied arrangement. Overlapping is okay but shouldn’t dominate. Intervals between the circles do not have to be even; in fact, they shouldn’t. “Bleeding” is okay. Compare with this student example only after you’ve attempted the exercise so you can confirm its general accuracy. Save as Rhythm5.0-YourUserName.jpg. Upload to Forum category: “Rhythm5.0″.
Can you begin to appreciate the difference between a graduated, steady sequence and varied, pulsating sequence? Can you also begin to see the difference between various types of rhythms?
Examples of this exercise applied:
http://pinterest.com/pin/308496643195423612/
http://pinterest.com/pin/308496643195400392/
http://pinterest.com/pin/308496643195691069/
Now let’s change things a little bit and add another layer of elements to coordinate.
6.0 Creating a Symmetrical Sequence of Two Elements:
6.0 Create a 5”x12” vertical format either by hand or digitally in low resolution. Fill it with gray. Create at least five perfectly round circles (each circle on a different layer if done digitally) all the same size. Create at least five straight lines (each line on a different layer if done digitally) all the same thickness and length. The color palette is either black and white. Assign black or white for all of your lines; assign the opposite for all your circles.
Next, arrange your circles in a vertically symmetrical arrangement. Space them apart from each other along a vertical axis as you see fit. Next, arrange your lines in a vertically symmetrical arrangement as well, spacing them apart from each other along a vertical axis as you see fit. Your goal is to create a vertically symmetrical composition where the left vertical half is identical to the right vertical half. If successful, you will have created a symmetrically balanced design that includes the principle of depth due to the overlapping of your objects and your arrangement of colors or values. Compare with this student example only after you’ve attempted the exercise so you can confirm its general accuracy but do not post.
Examples of this exercise’s principles applied:
http://pinterest.com/pin/308496643195691219/
http://pinterest.com/pin/308496643195691228/
7.0 Creating an Symmetrical, Altered Sequence of One Element:
7.0 Same instructions, same shapes and lines as used in 6.0. This time take only the lines and vary the vertical distances between the lines. Try playing with depth by placing 1 or 2 lines in front of the circles, and 1 or 2 lines behind the circles. Compare with this student example only after you’ve attempted the exercise so you can confirm its general accuracy.
Save as Rhythm7.0-YourUserName.jpg in the Rhythm 7.0 forum.
8.0 Creating a Symmetrical, Altered Sequence of Two Elements:
8.0 Same instructions as in 6.0, but remove one, two or three circles and one, two or three lines from the sequence of each so as to create an alternation in the sequence of circles and an alternation in the sequence of lines. Bleeding is okay. Compare with this student example only after you’ve attempted the exercise so you can confirm its general accuracy. Save as Rhythm8.0-YourUserName.jpg in the Rhythm 8.0 forum.
Examples of this exercise applied:
http://pinterest.com/pin/308496643195691179/
http://pinterest.com/pin/308496643195594857/ (asymmetrical, but the use of horizontal and vertical intervals is the important thing)
http://pinterest.com/pin/308496643195691208/
http://pinterest.com/pin/308496643195697985/
9.0 Creating an Asymmetrical, Altered Sequence of Two Elements:
9.0 Same instructions and same number of circles and lines as in 6.0, but arrange the circles asymmetrically. Next, arrange the lines asymmetrically. If desired, change the spacing within your pattern of circles or pattern of lines as you see fit. The goal is to create an overall sense of asymmetrical balance; in other words, a felt state of balance where mismatching halves in a composition feel equal in weight with each other. Compare with this student example only after you’ve attempted the exercise so you can confirm its general accuracy. Save as Rhythm9.0-YourUserName.jpg. Upload to Forum category: “Rhythm9.0″.
Examples of this exercise applied:
http://pinterest.com/pin/308496643195697806/
http://pinterest.com/pin/308496643195697876/
http://pinterest.com/pin/308496643195697918/
10.0 Creating an Asymmetrical, Altered Sequence of Two Elements with Focal Point:
10.0 Same results – same composition if you choose – as in 9.0, but now let’s create a focal point. As a reminder, a focal point is the single most active area in a composition. It’s the first place a viewer would go; you could call it a visual entry point. Not all compositions have one and that’s okay. It’s pretty dynamic when they do however. On the other hand, using more than one clear focal point begins to create confusion. Compare with this student example only after you’ve attempted the exercise so you can confirm its general accuracy. Save as Rhythm10.0-YourUserName.jpg. Upload to Forum category: “Rhythm10.0″.
Examples of this exercise applied:
http://pinterest.com/pin/308496643195697856/
http://pinterest.com/pin/308496643195697987/
http://pinterest.com/pin/308496643195698004/
http://pinterest.com/pin/308496643195698024/
11.0 Culminating Exercise in Rhythm
11.0 Goodbye circles and lines! Now, create your own content and create your own expression of rhythm. Like all the other exercises, this can be done digitally or by hand. Begin by creating a 6″x6″ format. Find or create the image of a two-dimensional shape. It could be something you’ve created or something you’ve found like on a package label or something in a photo, a very large letterform or even a block of text. Make sure you can either copy it numerous times or divide it up evenly as if you were going cut it up into a pattern.
Next, find or create the image of a two-dimensional object that has the general appearance of a line, such as a drawn line, a photo of a pencil, a section of rope, a blade of grass, or a line of text cut or copied from a magazine. Make sure you can copy it numerous times as well.
Through either cutting or copying, create enough content out of your shapes and lines to work with. No minimum, no maximum…just use your judgement.
You will now create a collage. In this collage, your shapes assume a pattern of rhythm and your lines assume a pattern of rhythm. Find an interesting way to integrate your pattern of rhythmical shapes with your pattern of rhythmical lines.
You do not have to fill out all the space. In fact, having “negative space” in your work can make the work even more dynamic.
Examples of this exercise applied:
http://pinterest.com/pin/308496643195836651/
http://pinterest.com/pin/308496643195697834/
http://pinterest.com/pin/308496643195836558/
http://pinterest.com/pin/308496643195836563/
http://pinterest.com/pin/308496643195836603/

Leave a comment